Wood Floors |
 |
Most vintage trailers have pretty bad floors. There are several options including laminate wood, vinyl, and carpet. I like laminate wood because it's fairly easy, they look beautiful and it lasts along time.
|
 |
It's best to start in the back left, in the deepest recess on the trailer. Remove any loose tiles, nails, or what ever else is in the way. It's best to do your floors last so you will keep from messing them up. Wood floor manufacturer's recommend putting down a moisture barier before installing the floor. This is NOT an issue in trailers. The real purpose for the barier is to eliminate clicking sounds when you walk on the floor. If you're concerned about clicking, go ahead and install the barrier.
|
 |
The biggest trick in doing these floors right is to make sure you're starting with a good straight line of boards before you start across the floor.
To do this, start cutting your boards for the recess, then proceed laying them out all the way to the front BEFORE YOU START NAILING THEM DOWN. This will ensure that when you begin going across the floor, that they are going to line up without any gaps.
|
 |
The pieces snap together with a tongue and groove system.
|
 |
You'll normally want the pieces to be staggered so that you don't have two seems together as in this picture. Since the wood I bought is so narrow (3" wide) I'm installing two pieces together to speed up the process.
When you come to an area that needs to be notched, measure the size of the notch and strip off whatever is required. You're going to put in a molding around the edge so perfect cuts and fits are not required.
|
 |
Use a screw driver to pry the pieces together. |
 |
Use a wood block and a hammer to tap them together. This will help keep from damaging your new floor. |
 |
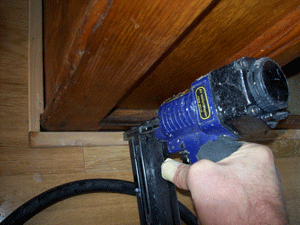
When you have the first row all connected and laid out, you can start stapling them down. Use 1-1/2" staples. Staple only around the edges. If you don't have a pneumatic stapler, use 1-1/2" nails. |
 |
To create the staggered effect, I only needed to have 6" pieces every other row. This is the annoying part of the job because you have to waste an entire board just to stagger them. Hopfully you'll be able to use the waste on the doorway. This is why I only staggered them by 6".
|
 |
When you get to the threshold of the door way, you'll find that every trailer has a different molding that was used and it probably wasn't designed to be used with wood, so you just have to get creative. Here I've used a carpet runner and just screwed it down. It worked real nice. |
 |
Lastly, you install the molding. The trick to making this look good is to hide the ends of the molding by placing molding in front of the edges from the most visible areas. Here I used 1"
molding, cut it with a jig saw and stapled it down with 1-1/2" staples. |
|
And it's a beautiful thing. Let's go kill some deer! |
| |
|
| |
|
| |
|
